“My little brother forgot iPhone passcode that he set on my iPhone X. He entered the possible password several times, but now my iPhone is disabled. How to fix the disabled iPhone without losing data? Thanks in advance!”
An iPhone is disabled if you are trying to unlock it too many times unsuccessfully. It is probably the most frustrating thing since you are completely locked out of iPhone. Fortunately, there are several methods you can try to unlock disabled iPhone without passcode. In this article, we’re going to explain why your iPhone is disabled and show you how to unlock a disabled iPhone by using iTunes, iCloud or Recovery Mode. Let’s check out!
- Part 1. Why Your iPhone is Disabled?
- Part 2. Which Way Should You Use to Unlock Disabled iPhone?
- Part 3. How to Unlock a Disabled/Locked iPhone Using iTunes
- Part 4. How to Unlock a Disabled/Locked iPhone Using iCloud
- Part 5. How to Unlock a Disabled/Locked iPhone Using Recovery Mode
- Part 6. How to Recover & Backup Data from Disabled/Locked iPhone
Part 1. Why Your iPhone is Disabled?
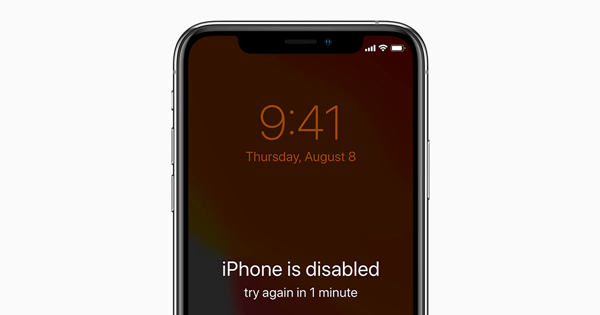
For security reasons, a passcode, Touch ID or Face ID is required to enter and access a locked iPhone. If you continuous enter the incorrect passcode, you will get a notification on the lock screen that “iPhone is disabled” and “try again in 1, 5, 15, 60 minutes” or even “Connect to iTunes”.
- For 5 incorrect passcode attempts, your iPhone will be disabled for 1 minute.
- For 7 incorrect passcode attempts, your iPhone will be disabled for 5 minutes.
- For 8 incorrect passcode attempts, your iPhone will be disabled for 15 minutes.
- For 9 incorrect passcode attempts, your iPhone will be disabled for 60 minutes.
- For 10 incorrect passcode entries, the iPhone will be totally disabled and ask you to connect to iTunes.
Part 2. Which Way Should You Use to Unlock Disabled iPhone?
How to unlock a locked iPhone? Typically, there are 3 ways to unlock a disabled iPhone, using iTunes, iCloud or Recovery Mode.
- If you’ve synced your iPhone with a trusted computer before and created a backup, use iTunes.
- If you’ve enabled the Find My iPhone option and remember your Apple ID and password, use iCloud.
- If you’ve never synced your device with iTunes or set up Find My iPhone in iCloud, use Recovery Mode.
Part 3. How to Unlock a Disabled/Locked iPhone Using iTunes
Provided that you’ve synced your device with iTunes before, you can reset your locked iPhone, iPad or iPod by connecting to iTunes. You will need two things: the particular computer your device trusted or synced with, and iTunes to erase your device.
- Plug your locked iPhone or iPad into a computer that it has previously synced to.
- Open iTunes. If asked to enter your passcode or trust this computer, skip to the iCloud or Recovery Mode method.
- Click your device icon and in the Summary tab, click on Restore iPhone (iPad or iPod touch).
- Now follow the on-screen prompts to erase your iPhone/iPad. When asked to set up your device, choose to restore from iTunes backup available.

Part 4. How to Unlock a Disabled/Locked iPhone Using iCloud
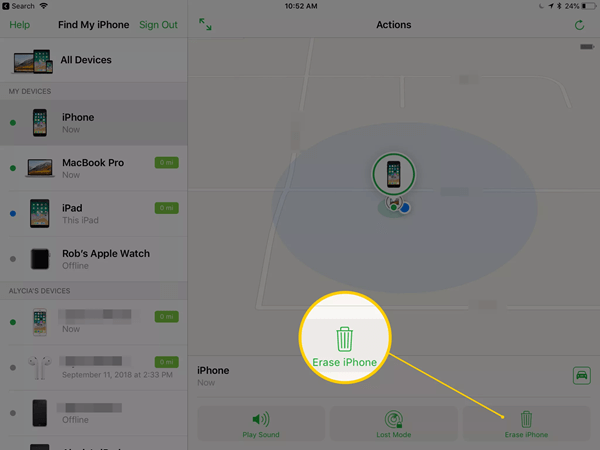
Supposing that you’ve enabled Find My iPhone in iCloud, then follow these steps to erase your device and passcode.
- Go to icloud.com/#find from another device or computer. If prompted, sign in with your Apple ID and password.
- Click All Devices at the top browse window and find the device that you want to erase. If you can’t find your device on the list, you should use Recovery Mode.
- Click Erase iPhone (iPad or iPod touch) to remote wipe the device and its password. The device itself needs to be connected to network, or this won’t work.
- After it’s erased, you can restore from a recent backup. If there is no backup, just check your iCloud Photos, Contacts, Notes etc. before you set up as a new iPhone.
Part 5. How to Unlock a Disabled/Locked iPhone Using Recovery Mode
In case that you’ve never synced your iDevice with iTunes or set up Find My iPhone in iCloud, you should force your device into Recovery Mode to erase all content as well as its passcode.
Step 1: Launch iTunes on your computer and plug your disabled iPhone with a USB cable.
Step 2: While connected, follow the things below to boot your iPhone into Recovery mode.
- For iPhone 8 or later – quickly press and release the Volume Up button, followed by the Volume Down button. Then press and hold the Power button until you see the connect to iTunes screen.
- For iPhone 7/7 Plus – press and hold the Power button and the Volume Down button at the same time, release the two buttons until you see the connect to iTunes screen.
- For iPhone 6s or earlier – press and hold the Power button and the Home button at the same time, release the two buttons until you see the connect to iTunes screen.
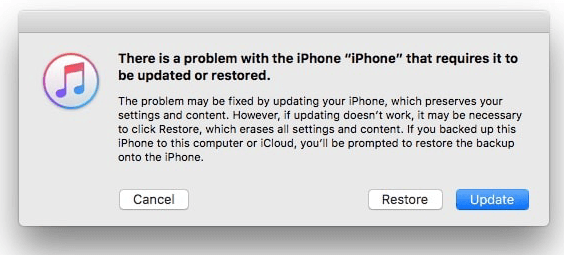
Step 3: When you see the option to Restore or Update in iTunes, choose Restore. When the restore completes, your iPhone will be reset to its factory conditions.
Note: If the process starts downloading the update file and takes more than 15 minutes, your device will exit recovery mode and you’ll need to repeat the procedure.
Part 6. How to Recover & Backup Data from Disabled/Locked iPhone
No matter which way you choose to unlock disabled iPhone, all your pictures, videos, contacts and other data on the device will be permanently deleted. If you have previously backed up your iPhone with iTunes or iCloud, you can restore from the backup. Instead of iTunes and iCloud backup, there are better options like Gihosoft Free iPhone Data Recovery, allowing you to recover & backup data from disabled iPhone 11/XS/XR/X/8/7/6s/6 or iPad running on iOS 13/12. But note that the device can be detected by your computer. Follow these steps below:


- Download, install and run this iPhone Recovery freeware on your computer (Your iPhone should have trusted this computer before).
- Choose the data like Photos, Contacts or Messages that you want to recover and backup, then click “Next” and plug your locked iPhone/iPad to the computer.
- When the device is detected by the program, click “Next” to begin scanning. After that, click “Recover” to backup data from locked device to your computer.
