If you repeatedly enter the wrong password on your iPhone, you will certainly end up with the error message “iPhone is disabled. Connect to iTunes”. What is going on? Well, this is Apple’s security measure to protect iPhone from unauthorized access, which is helpful in case your iPhone is lost/stolen but also cause problems if you forgot your own iPhone passcode.
It is really frustrating to getting locked out of your own iPhone. What should you do? You’ve come to the right place. Here we’ve got you covered. In this article, we will discuss why your iPhone is disabled and won’t connect to iTunes, as well as 3 quick ways to fix the error then regain access to your iPhone 11, iPhone 11 Pro, iPhone XR/XS/XS Max, iPhone X, iPhone 8/7/6s/6 Plus, iPad Pro, etc.
Now, let’s check out.
- Part 1. Why iPhone is Disabled and won’t connect to iTunes
- Part 2. Restore Disabled iPhone by Connecting to iTunes
- Part 3. Fix iPhone is Disabled Connect to iTunes via iCloud
- Part 4. Fix iPhone is Disabled Connect to iTunes in Recovery Mode
- Part 5. Data Lost after Fixing iPhone is Disabled Error
Part 1. Why iPhone is Disabled and Wont Connect to iTunes
If your iPhone is displaying the message “iPhone is disabled, Connect to iTunes”, then it is likely that the wrong passcode has been entered on your device more than six times. Typically, iPhone users are allowed five different failed passcode attempts before they are locked out. And on the sixth attempt, you will be locked out of your iPhone for one minute; on the seventh attempt, five minutes; on the eighth attempt, fifteen minutes; while on the ninth attempt, your iPhone will be disabled for sixty minutes.
If, on the tenth attempt, you still failed to enter the right passcode, you’ll get the notification – “iPhone is disabled. Connect to iTunes”. What’s worse, if the auto Erase Data mode is turned on in Settings > Touch ID & Passcode, all the data on your iPhone will be erased after 10 incorrect passcode entries.
Now that you’ve identified why you are facing this problem, the next step is to find a solutions on how to unlock the disabled/locked iPhone. If you are stuck with the message saying “iPhone is disabled. Try again in 1, 5, 15 or 60 minutes”, you can just wait for the specified time to pass then enter the proper passcode to unlock the iPhone. If you see the “iPhone is disabled. Connect to iTunes” or you don’t know the passcode, you can follow the 3 methods below to fix the iPhone is disabled error.
Part 2. Restore Disabled iPhone by Connecting to iTunes
If you’ve ever synced your iPhone with iTunes and back up data regularly, the easiest and most recommended way to unlock the disabled iPhone is connecting it to iTunes. Here’s how to do it:
- Connect your iPhone to your computer via a USB cable. Launch iTunes if it fails to do so automatically.
- In iTunes, find and click on the icon of your device to reveal your device’s info. You’ll see the icon located near the top-left side of your screen.
- Locate the Summary tab (it is usually the first of the tabs). Next, find and click on “Restore iPhone”.
- If at this point you get an error message saying Find My iPhone must be turned off, then you should quit this approach and use the iCloud method or the Recovery Mode method shown below.
- If you didn’t get any error message, proceed and follow the on-screen instruction. Your device will start up like any new iPhone after restore. You can either set it up as a new device or restore from any available iTunes/iCloud backup.

Part 3. Fix iPhone is Disabled Connect to iTunes via iCloud
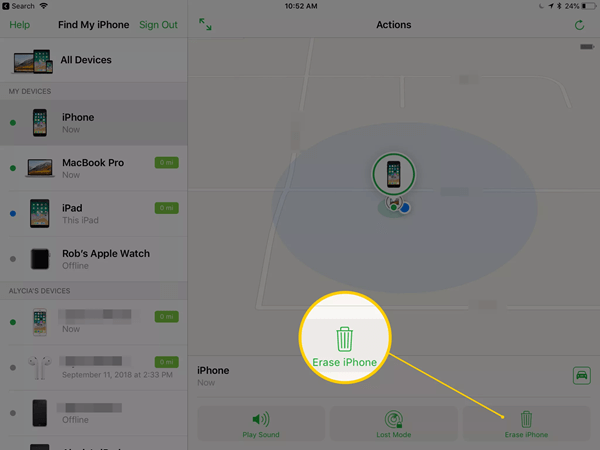
If the above method failed to unlock your disabled iPhone or Find My iPhone is enabled, you should attempt to bypass the iPhone is disabled Connect to iTunes by using iCloud. Follow the steps below:
- Visit icloud.com/find with your preferred browser on your computer
- Log in using your Apple ID and password > select “All Devices” > click on your disabled iPhone > choose “Erase iPhone”.
- You will be prompted to enter your Apple ID password to authenticate the action.
- Wait for a moment, your iPhone will be wiped and power back on like a new iPhone. Then set up your iPhone and restore from your most recent backup.
Part 4. Fix iPhone is Disabled Connect to iTunes in Recovery Mode
For users who have never synced their iPhone with iTunes or set up Find My iPhone in iCloud, the recovery mode is the option that worth a try to unlock a disabled iPhone. Here’s what you need to do:
Step 1: Make sure you have the latest version of iTunes installed on your computer. Then, connect your iPhone to the computer via a USB cable and open iTunes if it doesn’t do so automatically.
Step 2: Now, you need to force restart your iPhone and initiate Recovery Mode in the device.
- For iPhone 8, 8 Plus, or X: Press and release the Volume Up button quickly, then do the same with the Volume Down button. Next, press and hold the Side Button until your device enters Recovery Mode.
- For iPhone 7 or 7 Plus: Hold down your Sleep/Wake and Volume Down buttons simultaneously, continue holding the buttons until your device enters Recovery Mode.
- For iPhone 6s or earlier: Hold down the Sleep/Wake and Home buttons simultaneously, continue holding the buttons until your device enters Recovery Mode.
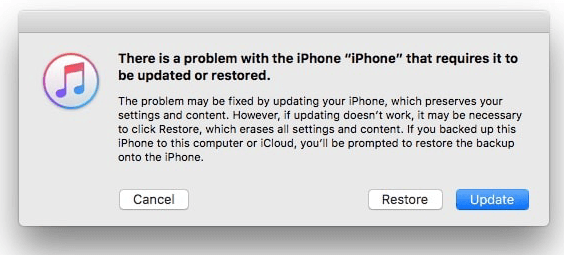
Step 3: Once your iPhone enters Recovery Mode, a dialogue box from iTunes on your computer will ask if you want to Restore or Update your device. Choose “Restore”.
Step 4: Wait for at least 15-minutes for iTunes to download the restored iOS software to your iPhone. If it fails, retry the steps above.
Step 5: When your iPhone has been successfully restored, it will start up as a new device. Set it up and restore your most recent backup.
Part 5. Data Lost after Fixing iPhone is Disabled Error
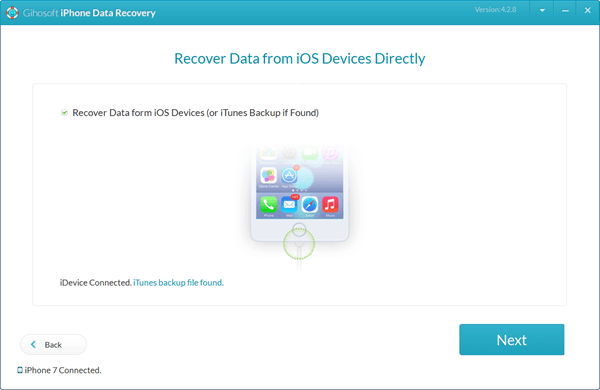
Whichever method you choose to fix your disabled iPhone, you may run the risk of losing all your data. If you’ve backed your iPhone to iCloud or iTunes, you can restore from that backup and get your lost data back. Instead of performing a full restore, we suggest you try Gihosoft Free iPhone Data Recovery.
This professional tool can help you extract and recover data from iTunes/iCloud backups. You are able to preview the data in the backups such as photos, videos, contacts, messages, WhatsApp, notes etc. and selectively restore what you need only. Plus, you can directly recover data from locked iPhone even there is no backup available. It is available for both Mac and Windows, and works well for all iOS devices including iPhone 11/11 Pro, iPhone XR/XS/X/8/7/6s, iPad Pro running on iOS 13/12.


Here’s how to recover data from iPhone after fixing the disabled error:
- Download, install and launch Gihosoft Free iPhone Recovery software on your computer. Select the file types you want to recover and click “Next” to proceed.
- Connect your unlocked iPhone to the computer using a USB cable and wait for the program to detect the device. (Or you can choose “View iTunes/iCloud Backup” to extract data from available backup.)
- Once the iPhone is recognized, click “Next” to begin scanning. After the scanning is complete, you can preview all recoverable files and select those you need, then click “Recover” to export files to your computer.
Conclusion
There you have it all – the 3 possible solutions to fix “iPhone is disabled. Connect to iTunes” error. With the information you’ve gathered in this post, you no longer have to sit on your hands; you now know what to do when faced with similar situations. Good luck!